Sunday, June 27, 2010

Crop Chocolate On-line Challenge: Altered Item

Ok, this CropChocolate.com challenge sent me running; all over the house that is. The greatest challenge for me on this one was finding something to alter. I went through every room in the house trying to find something. Finally, in my bedroom I stumbled upon a container one of my students gave to me years ago. I thought it was time for a facelift. What do you think?


My frugal nature would not let me set aside the unused pieces of Fancy Pants paper from the stepper card and I thought I could give them a new look. After cutting the pieces ( Key Lime Pie and Sweet Spring) to size, I inked them using Tim Holtz Shabby Shutters and Worn Lipstick.


I then added adhesive and randomly stamped using Versafine and the Me and My Big Ideas Sassy-icons stamp.


Love that one. It is currently on loan to me through a stamp swap. Might have to purchase that set.


I then adhered all of the pieces to the box including the top. I used my Crop-a-dile to cut a notch into both pieces (see inked photo above). For a final touch I added a variety of Dew Drops/Skittles using Glossy Accents.


I really think it looks much more inviting and definitely in line with this decade. Of course it was helped along with a bit of ink, in the name of love.

Until then.

Crop Chocolate On Line Challenge: Create A Card

Ok, I think this challenge at CropChocolate.com was created with my name written all over it. I saw a woman named Kay create this card and wanted to try to easily duplicate it. She used a scoreboard for everything. I wanted to use my scoreboard and the Cricut. It is all from two pieces of Fancy Pants paper. Here it is.


Wouldn't this be fantastic at place settings with little gifts enclosed for the attendants? Who knew a stepper card had another life? Check back for step-step-directions.


Once the gift box has been removed the card remains usable for display.


I chose a few sentiments that reflected the occassion. This could have also been stamped with flowers...but when a deadline is approaching, you go with quicker and easier.


Here is a side view of the card.

I had to add a bit of ink to this one, in the name of love of course.


Until then.

Crop Chocolate On Line Challenge: Recycled

CropChocolate.com has been running a marathon online crop this weekend for the Chocolatiers. Whereas I would have loved to enter them all, I had to pick and choose. There was a lot going on in my town this weekend. When I saw the challenge for recycled/repurposed items, I knew I had to enter. Here are the end results for my shaker card.

Front of card

Back of card


 I will write more of how this project came together but for now the inspiration was a package that once housed some Heidi Swapp embellies. I could not force myself to toss them. I knew they would come in handy and they did.


The only ink that was used on this card was from the leftover remnants from the previous three cards featured. I wanted to use it as a scrapbook page border, but used it for this instead.

Keep inking in the Name of Love.

Until then.

Friday, June 25, 2010

The Road to Independence

Hello again. When I created the background for the first card, I had several usable pieces remaining so I decided to turn it into two more cards and a border for a scrapbook page. I had someone ask what do you do with your scraps. I thought hard about it because I rarely have scraps. Any left over paper gets diecut immediately and used on a card later.

Here is the second card I created.


I used some star ribbon that I received as part of a summer/July swap. Isn't it gorgeous? I edged the white and the red mat with a goldleaf pen.


The base star is the chipboard piece that I decorated in the Naked Chipboard Vee-dio. I also edged it with gold leaf. It is ironic that it mimics the pattern on the red star. That was not planned but turned out well. Used a bit of Glossy Accents on the cupcakes.


Since the stamps are the same I wanted to change this one a bit so that all three had a different look. I decided to use the Fired Brick Distress Ink on the top, left the middle white and did the bottom with Faded Jeans.
I used the Cut n Dry nibs to be able to get into all of the crevices.

The epoxy sticker is from Creative Imaginations and it is also from the summer swap.


I had so much fun with this paper and deciding how to change up the card to make each one unique. Since I stamped it myself, I could place the elements where ever I chose. I decided to not create a pattern on purpose. This way each card could receive its own special treatment. I took tons of photos so here is another one.


Think about your own road to independence. When what you want is not available, create it yourself. Get out those small stamps that you purchased because collectively they can have a big presence.  Keep thinking and inking in the name of love.

 
Until then.

Monday, June 21, 2010

Celebrating Independence Day

Let me be the first to wish these United States of America a happy 234th birthday...you've come a long way baby! To celebrate, I am posting a card that I made for my Yahoo group's summer challenge. Everyone who enters gets a small prize from the hostess. It is definitely a win, win situation. I was able to put this one together last night and post it to the Challenge.


I gathered several of my July 4th stamps and created the background using an 8 1/2 by 11 sheet of white paper. I used red, blue and black ink only. I found the outcome to be quite striking and definitely one of a kind. I then cut the paper to make a few 5x7 cards and inked the edges in black. So what you are seeing is only a portion of the paper.
 
The USA is a Sizzix diecut that I coated with Glossy Accents and covered with the Martha Stewart Garnet micro beads. After the initial coating I felt I needed more beads and poured them. Afraid they might not adhere, I pressed on them just a bit. I should not have done that. Since the glossy accents was still tacky the beads spread a bit. I used my MM poker tool to 'clean-up' the spread.

Love the texture this added to the card without being overwhelming. I think it is simply perfect and made by me.

I used a red strip to create a border on the left. My Sakura white pen was used to create the faux stitching and I adhered a number of rhinestone stars and circles (from a summer swap).


This was a lot of fun and I was amazed at how quickly it came together. It was loosely based on a card I saw in a Cards Beautiful magazine. Since I like creating my own backgrounds, this was perfect for me.

Love using my inks and stamps to create something unique. Give it try and you will be amazed with your results. Let go of the need to be perfect and just create. Always be free to ink in the name of love.

Until then.

Saturday, June 12, 2010

CropChocolate Designs: Artsy Tag/Travel

I know I went crazy with the designs for www.CropChocolate.com. I wanted to try and use everything that was sent to me. I am not much of a chipboard or fiber girl, so this took some doing for me. It is not that I don't own any, I have LOTS, I just don't use it as much. So, out of my comfort zone I came and this beauty just seemed to come alive the more I worked with the design.

I started by using some of the Noteworthy paper from the Nature layout. I did not cut it to any specific size, I simply used what was left over. I stamped the image using TH Distress Red Brick and embossed with clear powder.

I also wanted to add a bit of texture to the card. I pulled out one of the Fiskars texture plates and ran the lower half of the tag through the Cuttlebug.


After staring at how to trim the image, I decide to use my Fiskars Deckle edge (my favorite) to do the job. I simply love this look.


To further enhance the texture I selected a variety of Distress Inks and used my Cut 'n Dry Foam pad along with the craft mat and just added color.


These foam pads can be washed. I generally reserve one pad per color. I was a bit lazy here but will wash them clean later.


I went in search of the perfect quote for this tag and came across this one. I used my punch and created the two slits on each side of the quote and the tag.


I used the deckle edged scissors and inked the vellum quote also. Then my gaze fell onto the Basic Grey Scarlet Letter fibers, And I knew the ones I wanted to use.

This was me having a play with my tools. Most of the times when I sit down, it is to try a new technique or experiment. 
Again, I had a great time. When I was perplexed about what to do next, I left it alone.

I really like that I got to play with my Distress Inks on this one. I love those. I have not started collecting the new colors but will take the plunge this summer. Pull out your products and try to use them in ways you hadn't thought about. This tag hanging from your door knob or on your bulletin board will remind you to always look forward. And when you do find your dream and capture the moment remember to ink it with love.
Until then.

Monday, June 7, 2010

Crop Chocolate Designs: Artsy Tag/Lady

It seems like I have Chocolate on the brain. If something must be there, Chocolate is not a bad thing, especially if it is CropChocolate.

This one is a project that I did not submit to
www.CropChocolate.com.  I was feeling a bit adventurous when I tried this project and had no idea where it was headed when I started, but I like where it arrived. I created two tags but this post focuses on the Lady.

As you can see this is some of the leftover cardstock from the Green Calendar project--5th Ave Sophia Harlequin. The lady is inked with the Radiant Rain Dauber.
This is how she looked once inked and embossed. I used a SeeD's swirl stamp to add some additional fun to the card.
I then used my
standard and scalloped Spellbinder 
rectangular dies to trim the Lady and the green backing piece.


After a bit of thinking I decided to stamp the green piece, and then realized the swirls would not be visible. So I edged the scallops with more of the Radiant Rain. I added a layer of foam dots to the back of the Lady and secured some Basic Grey fibers using a bit of scotch tape while allowing the extra bits to hang from the bottom and the top to form a loop.

I went back and inked the Lady card in green and added some embellishments: rhinestones and a glittered butterfly.


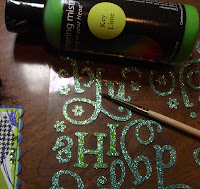
I again took the Flirty Alpha's that are quite bright, and gave them a wash with some Radiant Rain in Key Lime. Her quote simply says, Hi. Might go back and cut a green piece and then wash with the RR for a more cohesive look. Would provide a better contrast for the sentiment. I did go back and add a piece of green fiber to the card. Nice tag to hang from a cabinet or small knob.

Here she is in all of her splendor. I hope she brings a smile to your face. She certainly brings one to mine everytime I see her. The pose and the expression brings to mind an inner longing. I think of things that have been and things that could become--the past and the future merging as one.  I dream of limitless possibilites. Of course, each is delicately inked with love.
Until then.