Showing posts with label Birthday. Show all posts

Monday, August 12, 2013

Happy Birthday to my Double Digit Dude!!!

It has been a few weeks since my son celebrated his 10th birthday and I wanted to post the banner that he awoke to that morning.
The greeting was adhered to the wall using the blue painter's tape. He was overjoyed when he spied it. I have to admit that he did awake while I was in his bedroom putting it up on the wall but I was able to soothe him back to sleep. He did not recall a thing. After a delicious breakfast, he grabbed his new bat and posed for a picture beside his banner.

 
He posed for some other goofy ones, but I will save those for the scrapbook. In addition to his banner I also put together this card for him using some very old product that I purchased during the QVC days. I absolutely love those alphabet soup letters.
Zachary loved the entire day; we devoted it solely to him. He wanted a game for his Wii so off to Game Stop we went. In addition to his bat, he received a baseball glove, baseballs and a new basketball.
I did inform him that the single (digit) life was behind him and there was no looking back. He proclaimed that he will enjoy being 10. Gotta admire that kid's outlook on life.

Until then.

Sunday, July 29, 2012

Beach Birthday Bash

We spent Zachary's birthday celebration at Rehoboth Beach, Delaware, USA.


He had wanted a party at the National Zoo but Mom was a bit slow in getting her act together. I talked him into a beach trip.


We invited his grandmother and a cousin who shares the same birthday as him.


The boys wore themselves out and I relaxed for a full 15 minutes.


While I was away feeding the meter they were buried in sand and had to stay that way until I returned.

Their grandmother said they wanted me to see them. I think she milked it for a break. She knew where they were and did not have to follow them. lol


Here is the card I made for his birthday. He asked for dinosaurs...really?...and I was happy to oblige. He also wanted the Dilophosaurus on his cake.


He received gift cards to Toys R Us so that will be our next stop. He went to bed eight and woke up nine. That birthday eve he said to me this will be your last hug from your eight-year-old. I hugged him; held him tightly and shed a few tears. He is growing up waaaay too fast. So long eight, it was a great year.

Until then.

Saturday, July 14, 2012

Happy July Everyone. Just wanted to pop in and share a quick card I made for a birthday party we attended. The border across the top is a Martha Stewart punch.

I really kept it pretty basic by using some rub-ons on white cardstock which I trimmed around and mounted onto black. Across the center are some of the emboss and punch folders from Quickutz. The green backing paper is from WRMK paper by the pound.


Of course I had to add a bit of glitter with my Sakura pens. The inks are all Martha Stewart tear drops.

Until then.

Saturday, August 7, 2010

Happy Birthday to Me!!!

It is so hard to believe that another year has passed. I look down and before I can look up again, time has marched forward. I am thankful to celebrate another year and share it with all of you.

There have been a number of well wishes sent my way and I want to say a huge thank you to everyone. One of my Yahoogroup friends, NJ Debbie, sent this adorable card to me.


A little known secret is that I love Outline  Rubber Stamps and I can only imagine the time it took for Debbie to put this beauty together. I could not keep this treasure to myself and she did give me permission to share. 

Each layer is cut out and layered onto another layer. The second and third levels are raised on foam. I am honored that Debbie took the time to make this for me. The colors are gorgeous.  My picture taking does not do it justice. Everything has been embossed and has a nice textural look to it.

The entire ensemble is just breathtakingly stunning. I think the jewels are the icing on the cake.


Speaking of cake, I have to go and cut the one my son and I made together. It has been an awesome birthday for me. If you get a chance, check out my Youtube Vee-dio that I will post on my birthday scrapping HAUL...thought I would need a U-Haul to get out of there. lol.

As always use color to help bring a bit of joy to your lives. If it is inked in love, it is sure to be a winner just as my Birthday Card is from Debbie.
Until then. 

Monday, July 26, 2010

"7 Today" Card

Happy Birthday, Zachary. Yes, he is no longer my little baby boy. He is definitely becoming my little man. Weeping and sighing. My awesome son turned seven today. In honor of his birthday and his love for animals, I broke out the Dinosaur Tracks Cricut Cart and modeled his card after the one in the book.

As you can see, I took several liberties with the card. Since the T-Rex is his favorite I used that one instead. Did you know that the T-Rex lived during the Cretaceous period?


I cut the brown base card at 12x8 using the Bazzill Chocolate to create a 6x8 card when folded. The lighter Bazzill card was cut at 7 3/4 x 5 1/2. I cut the T-Rex card at 4 1/2.


I cut the DCWV Happy Birthday paper at slightly less than 4 1/2" (it needed to fit behind the cut out T-Rex).

The number 7 was cut at 2" out of the Happy Birthday paper and TODAY was cut at 1 inch from Fiskars red cardstock. I decided to use red to mat the 7 and added another mat of Chocolate card.

I used the remaining Happy Birthday paper to place behind TODAY. I then matted it again onto the Chocolate cardstock that I used for the base. I inked all of the letters and the seven with Vintage Photo.

Once I had cut all of my paper to size I inked the tan color in green and saw that the T-Rex looked a bit naked and wanted to use a layer for him. This might be able to be worked out, but I could not do that using the Card and layer icon features together. I eyeballed the piece and decided to cut the layer at 6" and it was a perfect fit!!! I used a sheet of brown leather look paper from Paper Pizzaz (HOTP).
 
 
I glued the layer to the card base and cut off the excess T-Rex. I punched two holes on the left hand side and threaded through the ribbon and tied a knot. Hapharzardly added the words across the bottom of the card. I put two red star brads through the holes in the number 7. Red is his favorite color. I also cut a T-Rex at 4 1/2 inches that I used on the inside of the card along with my message to him.
 
I like how the card turned out and can hardly wait to cut more images. We have been having loads of fun with this cart. The HOTP press animal skin prints is a perfect match with the Bazzill earthtones paper pack. I probably would have added more inking but I was in the middle of a huge digital project, but wanted to create a special handmade card for my son from me. He loved it!!!!
 
As always keep inking and thinking in the name of love.
Until then.

Sunday, April 25, 2010

Happy Birthday, Mom

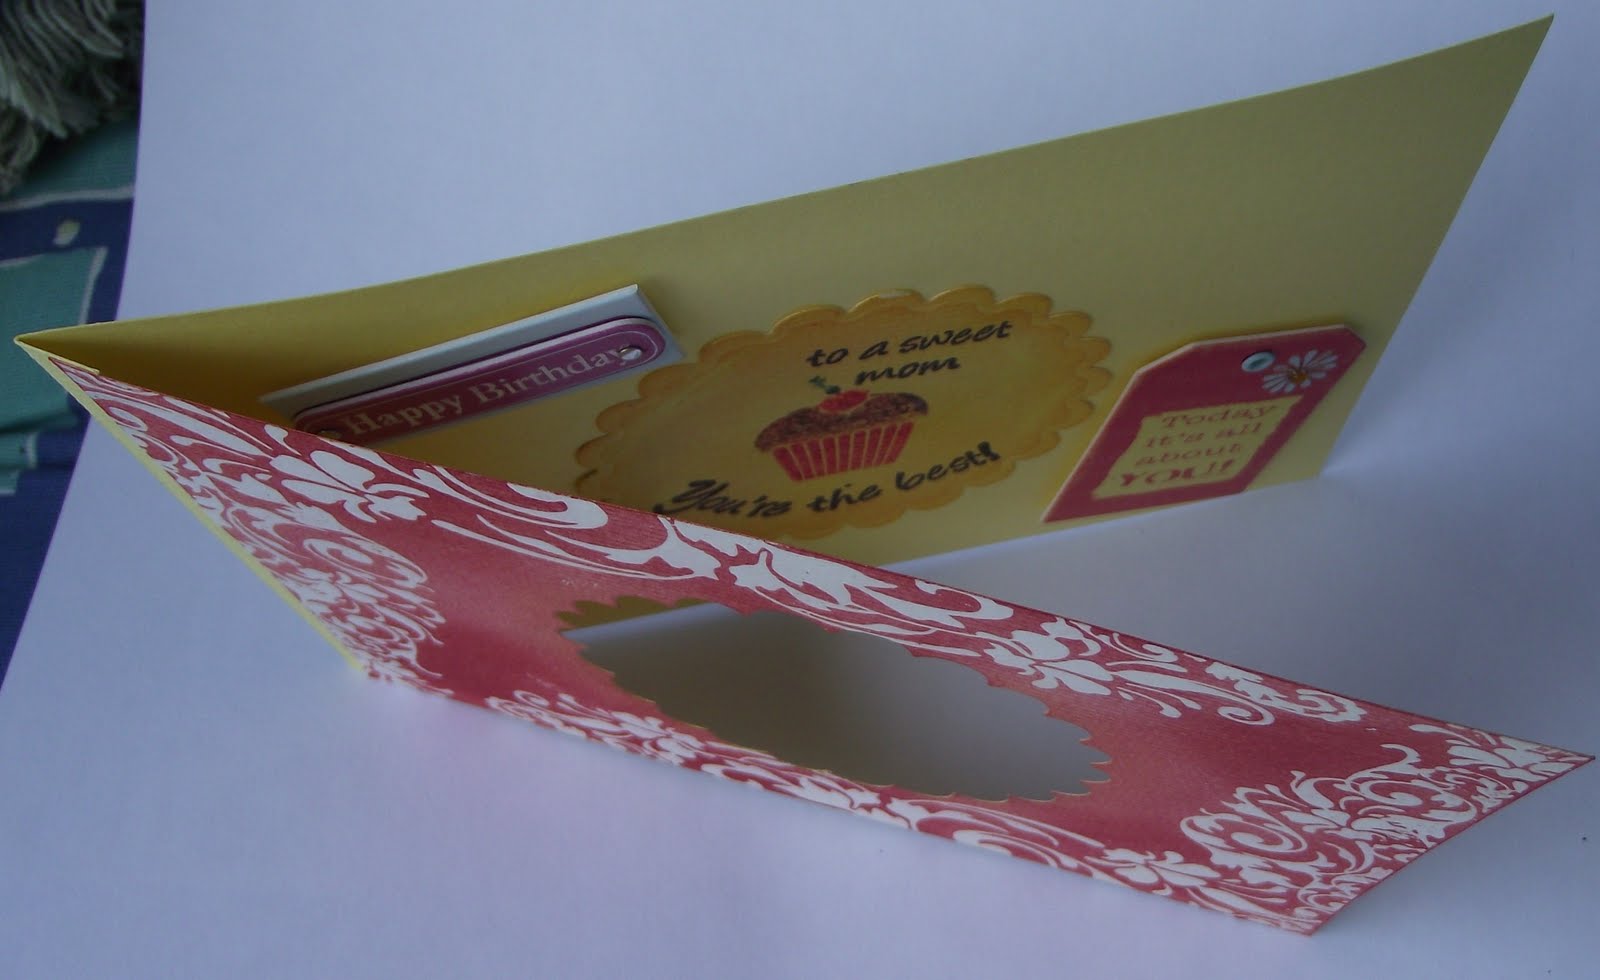
My mother celebrated her #?? birthday last week. Since I knew I would not be with her, I created this card and tucked a small gift inside for her to enjoy.


This was created when Flowers to Flourishes was running a Fancy Pants contest and I entered a few projects. I don't think the owner ever followed through on the contest.

Here is a top view. I tried to keep my dimensional elements to a minimum since this had to go through the post.


I made the foundation for this card during my aperture kick but never added any additional embellishments. I have several with the same theme. I love that they are sitting in my container waiting to be finished and personalized for that special someone.


Since this one was for my mother's birthday, I went to my birthday swap stash and pulled a few of the embellisments. I think they work well together.


I needed to leave some white space so that I could write in my sentiments and sign my name.


How did this all come together? I used watercolor paper as my base. I cut the aperture using the Spellbinders scalloped circle die. I then stamped and embossed the cover with clear ink and used the TH Distress Ink Fired Brick to cover the entire card. Next, I wiped the card with a dry paper towel to polish the clear swirls by removing the excess ink.


I turned the card over, reinserted the scalloped circle and covered the inside with the TH Distress Marigold. I dusted a bit of the Fired Brick on the circle for color continuity.

For some reason blogger is turning this picture and no matter how much I manipulate the size it is posting as portrait and not landscape.


For the right side, I measured a piece of watercolor paper and added an additional 1/2 inch to create a fold. The top was glued with a 1/4 inch border showing on the front. I decided not to cover the strip on the inside.
I stamped my sentiments on the scalloped circle and adhered that to the back of the card, added the other embellies and it was finished.

I usually go crazy and fill all of the empty space. I wanted to keep this one simple and clean.

This one was the same. It would only post in portrait.


After locating an envelope, this was ready to bring a smile to my Mom's face.


When I spoke with my Mother, she said that she loves her card. Mmmm, is she saying this because I am her daughter? lol.


I like crafting with watercolor paper because it can take as much ink and water as I want to use and not worry about the paper warping. If you have not tried it, do. Michael's has the Canson paper on a buy one get one. I picked up a few $2.99 packs.


That paper is the perfect opportunity to color, paint, and Ink in the Name of Love.
Until then.