This month's theme is 'All About Me'. I needed that since this is the one person I rarely focus on in my pages. Here is my take shown on this two page layout. I decided to go with the musical notes and took liberty with the ME.
All papers and alphas are from Fancy Pants. The music notes are Recollections and the flowers --I can't recall.
This is the base paper used and I tried to mimic the lines of a staff although they get buried under the photos. I used the Martha Stewart Crown border punch.
Next, I added the photos after matting them to white card embossed with the TH Music Texture Fade Folder.
Both of the larger photos are cards with space underneath for hidden journaling and/or personal photos. I die cut the center and turned it around and glued it back into place to add a decorative element. The butterflies and leaves are from Mrs. Elizabeth's line. One opens to the left and the other to the right.
The remaining elements were added. The 'All About' are Making Memories flat sticker alphas and I matted them to black to bring them out a bit. Wanted to use my white Thickers but had packed them away.
These are photos of me over the years. Many taken at school and I never know quite what to do with the leftovers. Well, here they are!!! There are more small ones that will go inside the card...So how many looks can one person have? If you are judging by me....MANY!!! I love changing my look. The most recent photo is the one under the word Smart. It was taken in Feb/March of this year.
Thanks for stopping by. Remember to keep inking in the name of LOVE.
Until then.
A place to discover unique and timeless ways to use ink to enhance your projects and your life.
Showing posts with label Fancy Pants. Show all posts
Saturday, May 21, 2011
Thursday, December 2, 2010
Bah Humbug
Well, not quite, but close enough. First I want to say a huge congrats to Laura Cox for being selected to be a guest designer for one month on the Cosmo Cricket Blog. She did some fabulous cards and layouts using the Cosmo Cricket Mitten Weather collection. Make sure you go and take a look at her work and leave her comment or two. I know that she likes getting them.
So why the 'Bah Humbug' you ask? Well a fellow scrapper and I submitted projects for the Outlines Rubber Stamp Design team but neither made the cut. Bummer. There is always next time.
To refresh your memory, this is one of the projects I submitted. The trees are from Outlines. I stamped them in clear embossing ink and then colored them using Distress Inks. I cut them apart and reassembled them onto a base tree stamped in black and embossed. The leftovers from the trees, (I cut them out) were used to create the presents at the base of the tree.
So why the 'Bah Humbug' you ask? Well a fellow scrapper and I submitted projects for the Outlines Rubber Stamp Design team but neither made the cut. Bummer. There is always next time.
To refresh your memory, this is one of the projects I submitted. The trees are from Outlines. I stamped them in clear embossing ink and then colored them using Distress Inks. I cut them apart and reassembled them onto a base tree stamped in black and embossed. The leftovers from the trees, (I cut them out) were used to create the presents at the base of the tree.
The Journaling is computer generated and I like the look it adds to this layout. I used the Sakura white gel pen to create the look of snow on the font.
Here is a closer look at those awesome trees. I love paper piecing. It is super easy to do with Outlines. I stamped and embossed the trees with clear ink. I then distressed each tree, cut it apart and reassembled it. I used Sakura Stardust pens to bling them out. Added a bit of the same glimmer to the presents--Fiskars Squeeze punch.
In addition to the layout, I also submitted the following card. I really went out on a limb and tried to think outside of the box for this one. My aim was to show how versatile one stamp could be. I frosted the trees with a combo Flower Soft mix. The reindeer are from Joys of the Season. They are soooo cute that I can barely stand it. The snow drops are the new enamels from Ranger.
Here is a closer look at those awesome trees. I love paper piecing. It is super easy to do with Outlines. I stamped and embossed the trees with clear ink. I then distressed each tree, cut it apart and reassembled it. I used Sakura Stardust pens to bling them out. Added a bit of the same glimmer to the presents--Fiskars Squeeze punch.
In addition to the layout, I also submitted the following card. I really went out on a limb and tried to think outside of the box for this one. My aim was to show how versatile one stamp could be. I frosted the trees with a combo Flower Soft mix. The reindeer are from Joys of the Season. They are soooo cute that I can barely stand it. The snow drops are the new enamels from Ranger.
I did the same stamping technique on this one except I kept the tree whole, used a variety of the green Distress Inks, and blinged out all of the decorative elements. This is a pop up card and you are seeing the inside. I tried to attempt a winter forest look. So I added a few snow drifts to the scene. It looks very festive to me and quite woodsy.
It's getting late and I want to get my fingers inky before retiring to bed.
Until then.
It's getting late and I want to get my fingers inky before retiring to bed.
Until then.
Wednesday, December 1, 2010
Happy Holidays
Hey y'all. In an effort to be better prepared, I started doing a few mock-ups for Christmas cards. I did this one and although I am blown away by the results, I do not think it is one I will make to send to everyone. It is not designed for assembly line style . Maybe if I cut the trees on the Cricut, it would work.
Anywho, here it is and what I did. You can view the card from either side. I love it.
I will try to keep this write up brief...it is close to midnight. So I used the Fancy Pants Holly Jolly and Frosted line for the card base (although you cannot see it---I did some incredible stamp work on it). I created an accordion fold by scoring at 2", 4", 6", 8" and 10" on a 6 x 12 sheet of paper. I cut a 2 x6 piece of Frosted to cover the base and the acetate overlay which is from the Slice line. I punched snowflakes from the Spellbinder dies and did some overlays on the Frosted which was edged with Vintage Photo.
The trees on the inside are chipboard pieces from Fancy Pants Happy Holidays printed chipboard shapes. They are pretty heavy, but the Fancy Pants cardstock is heavy duty and can stand up to the weight. Especially if you cut with the grain and score and fold against the grain. Makes for a nice crisp fold.
I digress. You can see my Vee-dio on paper cutting to get a better idea of what I mean.
The trees were already decorated on one side and when I removed the adhesive liner I covered the back with coordinating pieces from the Fancy Pants Line.
On some of them I stamped, embossed and/or used glitter. I went around all of the sides with an ink cube to hide the raw edges. As you can see, I added Skittles/Dew Drops to one of the trees.
I attached the trees with one of my favorite adhesives--Glossy Accents.
The acetate overlay was cut to 6 x 12 and scored at the 6 inch mark. I did not want the acetate to go all the way to the bottom of the card. It was attached using the Glossy Accents. I covered that with the Frosted piece and hid the line by covering it with a piece of really pretty ribbon--reminds me of the Martha Stewart double edge punch---it came in a holiday kit I purchased from QVC.
The journaling is also from the Fancy Pants Happy Holidays chipboard kit and was perfect to work as titles for the card.
It has been my pledge to use my Cricut more and for some reason I am stuck on the reindeer. So I used it again but this time used some holiday rubons from Cloud 9 for the neck gear and on the white cotton tail. Enamel accents adorn those swirly antlers and black glitter covers the hooves. I also spritzed the reindeer with the Coffee Shop Glimmer mist. It is cut at 2 1/2" and has a shadow.
I LOVE it!!!! Here are a couple more views.
Hope this card provides some inspiration for you and helps you to look at your stash just a bit differently. I was hesitant about the floraly overlay, but it is perfect for this card. Makes it look more like a winter wonderland.
It was a treat for me to envision this card and then bring it life. Getting to use my stamps, inks and sprays was awesome although much of it is hidden in the folds. I know why do the work only to hide it. Its kinda like what our mothers would say: Always wear clean underwear, you never know when you might have to go to the hospital by ambulance. Although you don't see the inside, I know that this is a finished card.
Keep thinking of new ways to ink during this festive season.
Until then.
Sunday, June 27, 2010
Crop Chocolate On-line Challenge: Altered Item
Ok, this CropChocolate.com challenge sent me running; all over the house that is. The greatest challenge for me on this one was finding something to alter. I went through every room in the house trying to find something. Finally, in my bedroom I stumbled upon a container one of my students gave to me years ago. I thought it was time for a facelift. What do you think?
My frugal nature would not let me set aside the unused pieces of Fancy Pants paper from the stepper card and I thought I could give them a new look. After cutting the pieces ( Key Lime Pie and Sweet Spring) to size, I inked them using Tim Holtz Shabby Shutters and Worn Lipstick.
I then added adhesive and randomly stamped using Versafine and the Me and My Big Ideas Sassy-icons stamp.
Love that one. It is currently on loan to me through a stamp swap. Might have to purchase that set.
I then adhered all of the pieces to the box including the top. I used my Crop-a-dile to cut a notch into both pieces (see inked photo above). For a final touch I added a variety of Dew Drops/Skittles using Glossy Accents.
I really think it looks much more inviting and definitely in line with this decade. Of course it was helped along with a bit of ink, in the name of love.
Until then.
Sunday, April 25, 2010
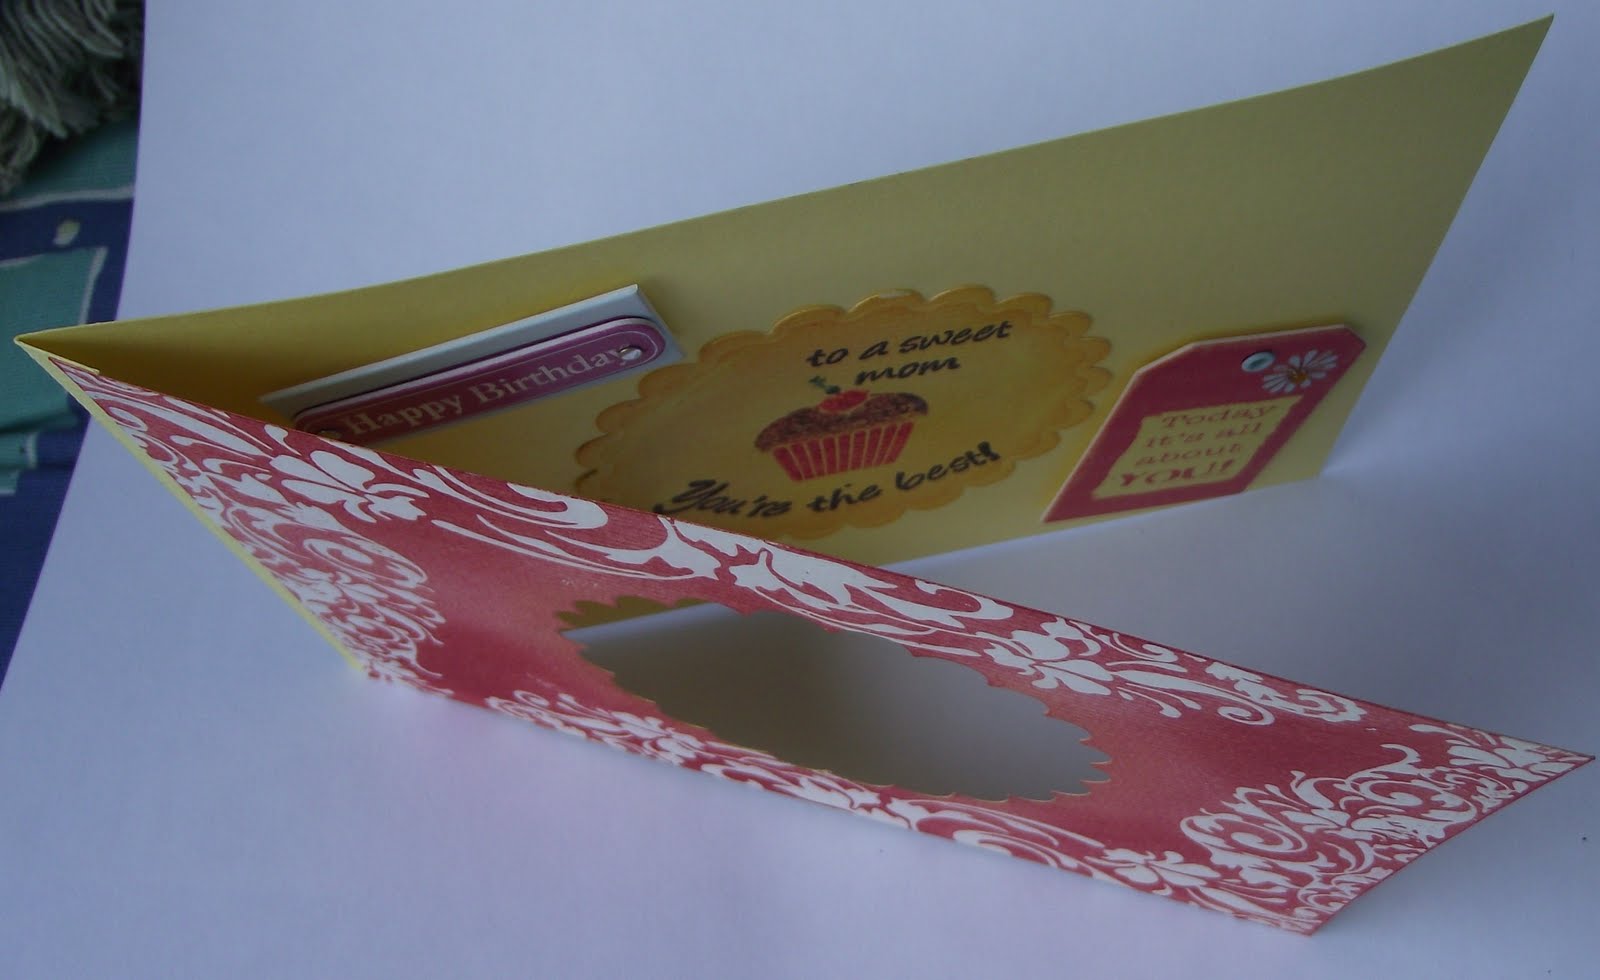
Happy Birthday, Mom
My mother celebrated her #?? birthday last week. Since I knew I would not be with her, I created this card and tucked a small gift inside for her to enjoy.
This was created when Flowers to Flourishes was running a Fancy Pants contest and I entered a few projects. I don't think the owner ever followed through on the contest.
Here is a top view. I tried to keep my dimensional elements to a minimum since this had to go through the post.
I made the foundation for this card during my aperture kick but never added any additional embellishments. I have several with the same theme. I love that they are sitting in my container waiting to be finished and personalized for that special someone.
Since this one was for my mother's birthday, I went to my birthday swap stash and pulled a few of the embellisments. I think they work well together.
I needed to leave some white space so that I could write in my sentiments and sign my name.
How did this all come together? I used watercolor paper as my base. I cut the aperture using the Spellbinders scalloped circle die. I then stamped and embossed the cover with clear ink and used the TH Distress Ink Fired Brick to cover the entire card. Next, I wiped the card with a dry paper towel to polish the clear swirls by removing the excess ink.
I turned the card over, reinserted the scalloped circle and covered the inside with the TH Distress Marigold. I dusted a bit of the Fired Brick on the circle for color continuity.
For the right side, I measured a piece of watercolor paper and added an additional 1/2 inch to create a fold. The top was glued with a 1/4 inch border showing on the front. I decided not to cover the strip on the inside.
When I spoke with my Mother, she said that she loves her card. Mmmm, is she saying this because I am her daughter? lol.
I like crafting with watercolor paper because it can take as much ink and water as I want to use and not worry about the paper warping. If you have not tried it, do. Michael's has the Canson paper on a buy one get one. I picked up a few $2.99 packs.
That paper is the perfect opportunity to color, paint, and Ink in the Name of Love.
Until then.
This was created when Flowers to Flourishes was running a Fancy Pants contest and I entered a few projects. I don't think the owner ever followed through on the contest.
Here is a top view. I tried to keep my dimensional elements to a minimum since this had to go through the post.
I made the foundation for this card during my aperture kick but never added any additional embellishments. I have several with the same theme. I love that they are sitting in my container waiting to be finished and personalized for that special someone.
Since this one was for my mother's birthday, I went to my birthday swap stash and pulled a few of the embellisments. I think they work well together.
I needed to leave some white space so that I could write in my sentiments and sign my name.
How did this all come together? I used watercolor paper as my base. I cut the aperture using the Spellbinders scalloped circle die. I then stamped and embossed the cover with clear ink and used the TH Distress Ink Fired Brick to cover the entire card. Next, I wiped the card with a dry paper towel to polish the clear swirls by removing the excess ink.
I turned the card over, reinserted the scalloped circle and covered the inside with the TH Distress Marigold. I dusted a bit of the Fired Brick on the circle for color continuity. For some reason blogger is turning this picture and no matter how much I manipulate the size it is posting as portrait and not landscape.
For the right side, I measured a piece of watercolor paper and added an additional 1/2 inch to create a fold. The top was glued with a 1/4 inch border showing on the front. I decided not to cover the strip on the inside.
I stamped my sentiments on the scalloped circle and adhered that to the back of the card, added the other embellies and it was finished.
I usually go crazy and fill all of the empty space. I wanted to keep this one simple and clean.
This one was the same. It would only post in portrait.
After locating an envelope, this was ready to bring a smile to my Mom's face.
When I spoke with my Mother, she said that she loves her card. Mmmm, is she saying this because I am her daughter? lol.
I like crafting with watercolor paper because it can take as much ink and water as I want to use and not worry about the paper warping. If you have not tried it, do. Michael's has the Canson paper on a buy one get one. I picked up a few $2.99 packs.
That paper is the perfect opportunity to color, paint, and Ink in the Name of Love.
Until then.
Saturday, August 1, 2009
Back on track
Wow. This has been a whirlwind time for me. I realize that I have been extremely tardy in posting to this blog. All for a good reason. I have been busy making videos for Youtube. I have also added a link so that you can view them from here. I am currently working on videos 8, 9, and 10. There is sooo much to do that I get chills just thinking about all of the creative ways to use my products.
Just this week, I received an order from Luminarte. It is loaded with Twinkling H20s, Radiant Rain and Daubers. The colors are simply luscious. Look to see card and page layouts using those products appearing soon. At some point I hope to post all of the cards I made on Youtube and have some of the instructions available for anyone who would like to duplicate the ideas.
This is the inside view. The left side is stamped with a variety of flower images and I used Sakura pens to add a bit of sparkle.
Just this week, I received an order from Luminarte. It is loaded with Twinkling H20s, Radiant Rain and Daubers. The colors are simply luscious. Look to see card and page layouts using those products appearing soon. At some point I hope to post all of the cards I made on Youtube and have some of the instructions available for anyone who would like to duplicate the ideas.
Just in case you thought my life ended at Easter, it did not. Here is a card that I sent to my mom using the emboss resist technique with a Fancy Pants flourish stamp, a nestability die, some water color paper, and distress inks. I almost did not want to add the Happy Mother's Day message to the front because I did not want to detract from the overall symmetry of the card. At the last minute I stamped a small greeting and hand cut and layered the circles. The flower is held to the aperture using the Glossy Accents from Ranger. That stuff is awesome. I use it like glue most of the time.
This is the inside view. The left side is stamped with a variety of flower images and I used Sakura pens to add a bit of sparkle. I also used the Fancy Pants stamp to create a border on the right hand side. I like how the flower and the scalloped circle mimic each other. This is one elegant card. My mom says she received numerous compliments.
Remember to think in ink and always in the name of love.
Until then.
Subscribe to:
Posts (Atom)


