Sunday, November 7, 2010

CropChocolate Challenge #3

This challenge was to create an Easel card. I have done several of those and did a really cute one for a summer challenge. I was scrambling for a 'new' idea for this one and decided to do a dinner invitation. I had considered doing a menu card for the actual dinner, but was getting a bit tired and wanted a stamp plain and simple. Here are the results.


I wanted a bit of flair for the card so I used the Spellbinders Mega curved rectangle dies for the project.
I first cut the base card at 4 1/2" by 12" and scored and folded it in half. The die I am cutting with measures 4 inches. This will make sure that the entire card gets cut.


I used the largest die for this project and placed the folded card with the fold just underneath the cut line at the top. This will ensure a connected card once it has been cut.


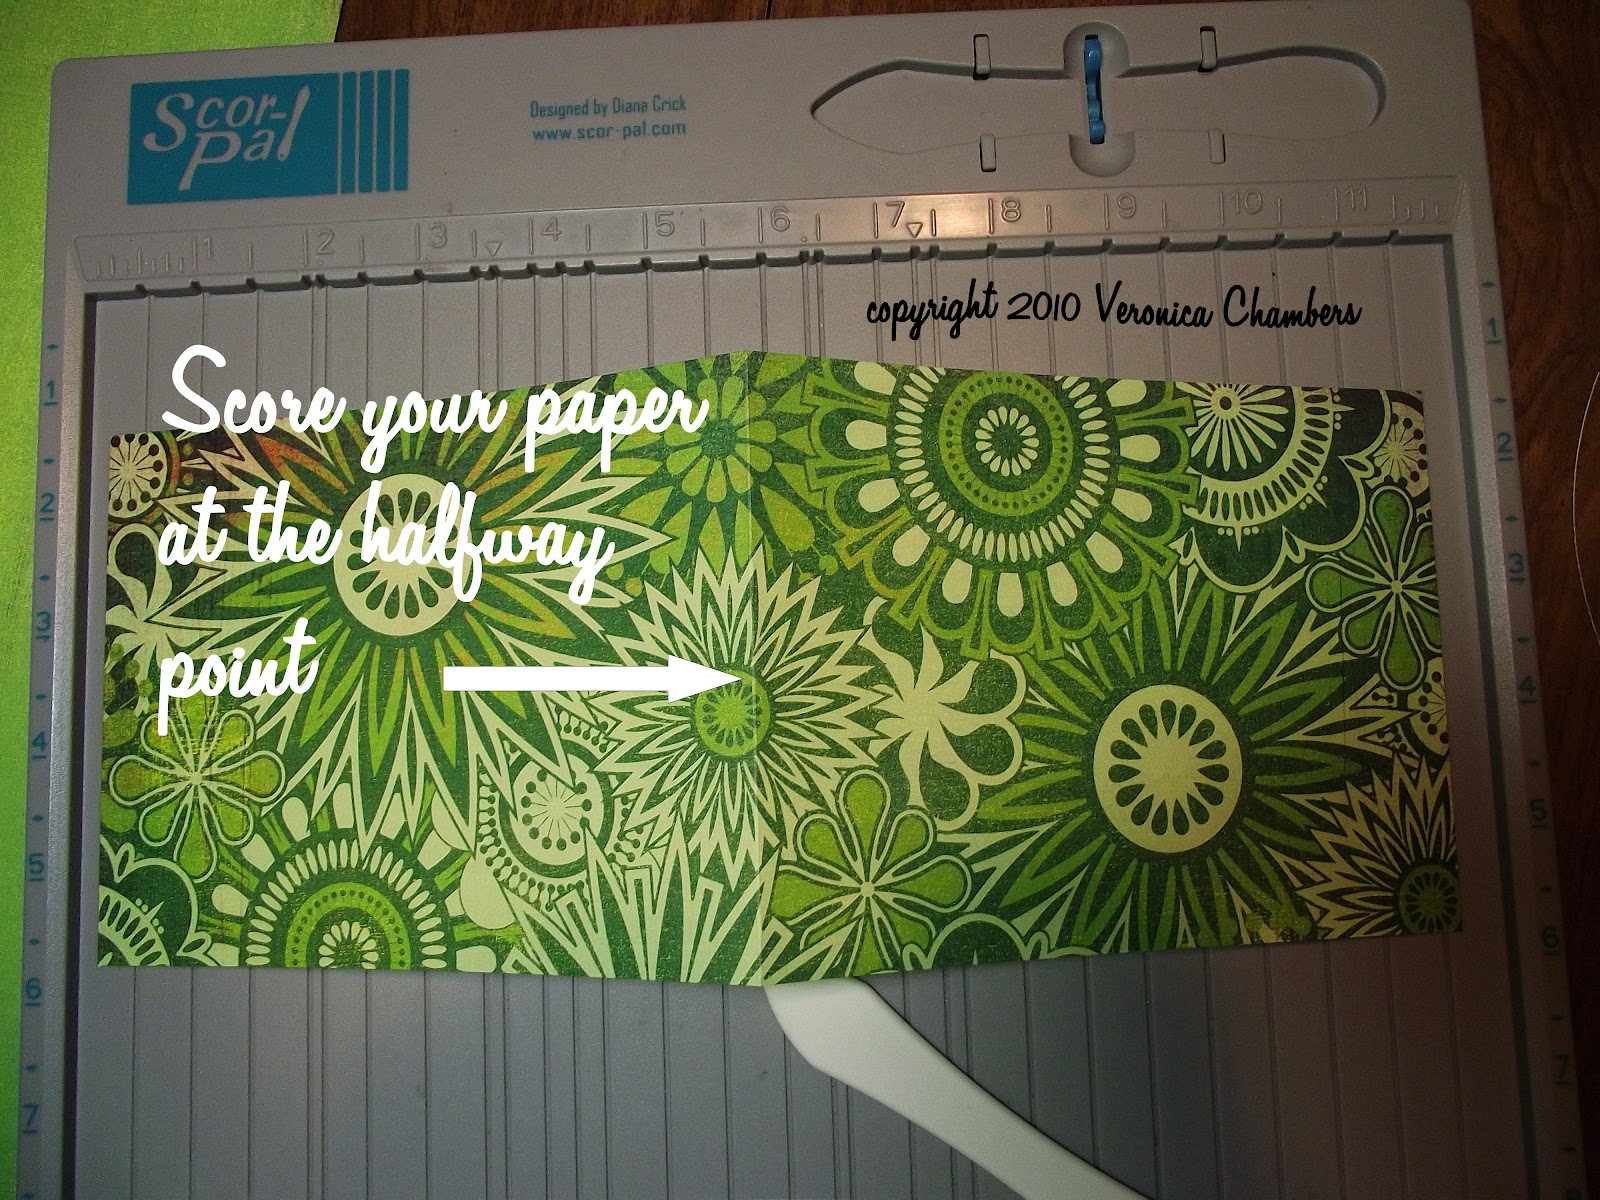
After cutting the base card, I went to my score board and scored on the halfway mark of just one of the rectangles.


Since the Basic Grey Lime Rickey paper is one sided, I decided to cover the bottom portion with a coordinating piece of card stock to cover the white. I placed it just shy of the cut lines so that it would be the same size as the card. I inked the white base just in case my gluing went awry.


Then I cut the base layer piece out of a single sheet of green paper using the die just one size down. I then embossed with a Sizzix folder and used Peeled Paint Distress Ink to bring out the embossing. I used a cut n dry foam pad and gently swiped over the raised portions.


Next in line was the frame for the rectangle. I used a magnetic sheet I have to hold the two rectangles in place to get an evenly cut frame. I then put that through the Snowflake Cuttlebug folder.

I also cut a large rectangle from the patterned paper for the standing piece. 

The next size down was cut for the stamping of the invitation. This was done on white card stock and edged with green and yellow inks. The Martha Stewart Dinner stamps were used. The green ribbon is simply there to hide a boo-boo. ooooppppssss.

Here are all of the components of the card.


All pieces were distressed with Shabby Shutters ink. Foam dots were placed under the frame to give some depth.


 Now it is time to apply the standing piece to the card base. Remember that you are only gluing down half of the card. Only apply adhesive to the bottom portion of the card.


Glue the solid green piece to the bottom of the base card. Your card is now completed. The texture on the card and the base piece keeps the card standing. 


If you want extra support stamp and cut out another element and adhere that about 1/3 from the edge of the base card. This will help the standing card stay in place.


It is now time to see if I can complete at least one more challenge. I have so much other work to do today that it might not happen. If it does, I will be certain to post it here.
Of course loaded with lots of ink.
Until then.

CropChocolate Challenge #1

CropChocolate.com is having their online crop this weekend and I have been feverishly trying to complete the projects, update it to my blog and give my DS some mommy time. It is a lot but I think I am doing ok. 
I have two completed projects and would like to share them here.

Challenge #1 was to complete a layout based on an advertisement. 


I have to admit that upon first glance this layout did not inspire me to do anything but wait for the next challenge. Since I had planned to participate, I decided I had best get my thinking cap on. I had some fall photos of DS from 2005 that  I had been planning to scrap for Lyn's fall challenge (never did) so I thought it is now or never. This is my take on the inspiration piece. 


The paper I had planned to use was from the Karen Foster Designs Autumn pack. I selected the paisley print as my background although it is paper weight. 
 
I took that to the ScorPal to imitate the grid lines on the inspiration piece.  I started with a half inch border on all sides and then divided the sections. I edged all of the lines using Memories Direct black pigment ink cube. 


The inspiration piece had what appeared to be a watermark title in the background and I decided to imitate that by stamping AUTUMN. I used the KI Memories alphabet stamps along with Tim Holtz Aged Mahogany Distress Ink which I embossed with clear embossing powder. This was my first time using the Fiskars stamp press and I think I like it. My entire word would not fit so I had to stamp the U and the N separately. Then I took the entire piece and misted it with Glimmer Mist Red Suede. While I was at it I misted the two mulberry leaves.


Next I needed to prepare my photos. After measuring the inside squares and rectangles I cut my photos down to size. I decided to mat only one of them. I cut the striped paper, distressed the edges with my scissors, inked them with Memories Direct red ink cube, dipped each side in clear embossing powder and heated it. I cut a complementary circle for the geese and sprayed with Red Suede. I then edged the circle with Aged Mahogany.


After affixing my photos I went back into that same fall stash to find embellishments suitable for the layout.


The rubon letters were perfect for this piece. I used the corner photos to bring cohesion to the date. Speaking of the date I used the black sticker letters that came with the kit. The glittery stickers are from Miss Elizabeth's (the brand sold at the Dollar Tree). I added red rhinestones to the page title and the flower and acorn cluster.


The rest of the rubons were placed where I felt they had the most impact. I love this set from Karen Foster. This is a well-put together kit. I really did not have to go outside of what was available to make a delightful fall layout.


I love this quote:  "Mother Nature's favorite season".


I love this challenge in that for no other reason, it got me to crop those fall photos from five years ago. That is the beauty about not doing chronological scrapping. I can scrap whatever photos suit the moment. Out of the hundreds that I take only a select few are actually printed. From that I narrow it down to five for a page layout--one or two page. 

Well, I am off to work on the next challenge. It is an Easel Card. Sure wish I could have submitted the one I did over the summer. It was a Shaker/Easel card. Oh well, this one will get me thinking outside of the box also.

Of course it will be lovingly done in ink.
Until then.

Friday, November 5, 2010

CropChocolate Online Weekend Crop


As if there were not already enough chocolately goodness going on at CropChocolate.com, the deal has been sweetened by a weekend with fun filled challenges, games, and chatting with old friends and making new ones.

Here's the official announcement:

What could be better than spending a weekend creating with a group of friends plus chances to win awesome prizes? We can’t think of anything better than that, so CropChocolate.com will be hosting its first ever 48 hour Online Crop on Saturday and Sunday, November 6th and 7th, 2010! Here are some details:


WHO: This crop is for everyone–CropChocolate.com addicts, errr…I mean, regulars, the newly introduced, or those who have never even heard of the site until now. All you need to participate in the Online Crop and to be eligible for the prizes is to have an active CC account with a valid e-mail address.

WHAT: An Online Crop–It will be part shopping, part crafting, part challenges, and completely fun! We will be doing virtually what you would do at a physical crop…Getting together, since we cannot be in the same place, at least at the same time, to socialize and participate in some challenges, win some prizes, complete some projects (layouts, cards, altered items–you know finally use up some of those beautiful CC goodies you have been hoarding), and have some fun!

WHERE: On www.cropchocolate.com, of course! Spread the word! The main challenges will be featured on the main page of the site throughout the day on Saturday and Sunday in between some SWEET deals on the “treat” page! Worried that you missed a challenge? Don’t be! All you have to do is look under the “past deals” section of the website to see the previous challenges. There will also be some fun mini-games and activities going on under the Sweet Talk section of the website throughout the weekend, so make sure to stop by Sweet Talk and check them out too.

WHEN: The BIG dates to mark off on your calendar are Sat. & Sun., November 6-7, 2010! Can’t make it for the whole weekend? No worries! The main challenges will be posted beginning on Saturday November 6th at 10:00 AM on the main page and it will alternate a challenge, then a SWEET deal, then another challenge, etc. If you miss a challenge on the main page they are always accessible under the “past deals” section of the website. The deadline for the submission of projects to be considered for prizes for the challenges is MONDAY, NOVEMBER 8th, 2010 11:59 PM MST (CC time) unless an earlier deadline is stated. That is approximately 24 hours after the crop ends. The challenges will be posted between 10:00 AM and 10:00 PM on Saturday Nov 6th and 10:00 AM and 6:00 PM on Sunday Nov 7th.

WHY? Because we are sooo SWEET on YOU! CropChocolate.com has a strong and vibrant community and we want to share that community with more of our current and potential customers. We think YOU are what makes CropChocolate.com unique, and we like that.

Sweetly,
Megan Ann

If many of your tools and supplies are collecting dust like some of mine, now is a great time to get them out. Make sure you stop in and try some of the awesome challenges that will posted.

Wednesday, November 3, 2010

Lyn's October Challenge

First let me begin by saying that I usually put things off until the last minute. Well, this challenge was no different. The cut off time is midnight of the challenge month. You guessed it. There I was on Halloween trying to put my card together. So what happened to the other 30 days? Ummm..it's all a blur. Remember the teaser I posted yesterday? Here it is again in case you missed it.


Well once I got this idea in my head, I could not stop.
I was really shocked that I was able to bang this out in about an hour, hour and a half. This was my mock up piece so that I could work out the glitches for the final scene. Yes, you guessed it, Ms. Procrastinator waited too late to start working on it so for now this is the final. The other one is in progress. If I can settle down, I will finish it.


I love this silhoutte stamp that I got at JoAnn's. Ideal for so many uses. There were several techniques used in creating this scene that I could not write out all of them if I had the desire, which right now I don't. My eyelids are closing down on me.


Suffice it to say that I used my brayer and several shades of Adirondack Dye ink pads along with my Sakura pens, eclipse tape and several stamps. The sentiment is Hero Arts. I will most likely show on a Vee-dio how I did the title.


While this was drying my son stuck his lovely fingers into the matte and glossy accents. He wanted to know if they were dry. They were not.

I thought I would play around by covering the boy (gloss) and girl (matte) in it to see if they looked any different. They really did not.

Always thinking and inking in the Name of Love.
Until then.

Tuesday, November 2, 2010

Happy Hour Challenge: 4

Well, it is a wrap. Officially, I am done with all of the Happy Hour challenges hosted by Laura. Believe it or not I felt this one was the easiest but took me the longest. I wanted to try some different spins on the resist techniques but was not pleased with the first four attempts. Most of the difficulty could be attributed to the flower stamp I selected. Since I was stuck with it I had to use what I had. Ready for the unveiling? Tada!!!!


I did not take photos in progress of this one, but I will give a bit of background. The papers used are from DCWV. I stamped the image on a 3x4 piece of paper weight paper using Versamark and  clear embossing powder which I heat set. Then I went about coloring in various portions with numerous Distress Inks using my Cut n Dry Foam pads. 


I edged the entire focal piece in Vintage photo and gave it a final spritz of Tattered Angels Glacier Mist. I cannot stress enough how versatile this particular spray is for me. It is a shimmery blue but gives just the right amount of color to almost any project. As an added bonus it causes the Distress Inks to blend more.


I cut a piece of blue at 3 1/2 x 4 1/2 inches and inked the edges with Stormy Sky. I put that through the Cuttlebug Harlequin folder.


The paper weight piece was cut at 3 3/4 x 4 3/4 and the edges inked with Mustard Seed.


The brown piece was cut at 4 1/4 x 5 1/4 with the edges inked in Vintage Photo and embossed with the Harlequin folder.


I did not get a chance to finish off the card by adhering it to a base and attaching a sentiment. That will have to wait. I considered using Skittles, Dew Drops or pastel brads in the centers but wasn't sure that I liked the look. Here is a photo I took to ascertain the effect. Not thrilled. 


So for now, I am going to stick with this. If I can get the entire card put together I will edit this post to add it. I forgot that DS had a playdate this afternoon/evening and allowed time to get away from me. 


There was not even enough time to make my famous Chicken Pot Pie. The chicken smelled so yummy bubbling away in the Crock Pot. There is always tomorrow.


Speaking of tomorrow, I will post my October Challenge entry from my Yahoo group. I had a lot of fun with it. Wanna see a sneak peek? Ok, here it is.


As you can see all was lovingly inked.
Until then.

Monday, November 1, 2010

Happy Hour Challenge: #3 Part 2

Hello again. Don't you just love long winded people? That would be me. Ok. Ready? After completing my flower, I stared at it and wondered what in the world am I going to do with it. I decided to turn it into a flower complete with stem and leaves.

Still using my same stamp, I inked the stems portion with various Memento inks in the green family and stamped a full sheet.


Next, I turned the sheet to the back and using a MS leaf stamp, I stamped several leaves and selected the ones I wanted to use. I cut those out and using my stlyus, dry embossed the leaves and hit the high spots with diffent shades of green Memento Dew Drops inks.

I then used the remaining paper to create a stem. I drew this free hand cut it out and then using the stylus embossed the back. 
 
Again, I used the Memento Dew Drops in green to add more depth.When dry embossing by hand it is a good idea to run a small piece of waxed paper over your piece for an easy moving stylus.


I decided to use the leftover portion as a base of grass. I dry embossed on the back and roughed the edges with the scissors and inked them.  


That is when I ran into a bit of a problem.


While trying to find a backing piece for the flower, I selected to use a striped complementary paper weight sheet.
Well not realizing this was not heavy card stock, I ran the paper through the Cuttlebug twice and ruined it.
I saw a left over piece and tried to salvage. Hence the line through the middle of the base paper--Tim Coffey or Brenda Walton.

I anchored the stem to the paper using glue dots that I rolled into a ball and adhered it to the Bamboo Cuttlebug sheet.

My purpose was to leave space for inserting the leaves.

I strategically placed two foam dots under the leaves and used the Scotch wet glue on the stems.

 
I kept placing the flower on top to get a feel for spacing. Then I was ready to apply the foam dots to the leaves for dimension and glue the stems in place.


Once all the supporting elements were to my liking, I applied liquid glue to the bottom of the flower and held it in place on top of the stem until it adhered.

The last thing to do was to place the grass over the flower and trim the edges. Hello Friends was cut from a Provo Craft folder and the white gel pen to draw a stitch line around the page is from Ranger.


After much further ado, here is what Challenge #3 helped me to create. This was a lot of fun and very freeing in the process.
This is my number three entry, can hardly wait to get to number 4.

Oh, yes. Challenge #4: This one involved a dual challenge. To create a card using one of these four resist techniques: crayon resist, Versamark resist, Versamark with clear embossing powder, and Micro Glaze.

Off to put the final touches to card number four and a reveal on this blog. Anyone want to hazzard guess?


Lovingly in ink,
Until Then
