Showing posts with label Flowers. Show all posts

Monday, November 1, 2010

Happy Hour Challenge: #3 Part 2

Hello again. Don't you just love long winded people? That would be me. Ok. Ready? After completing my flower, I stared at it and wondered what in the world am I going to do with it. I decided to turn it into a flower complete with stem and leaves.

Still using my same stamp, I inked the stems portion with various Memento inks in the green family and stamped a full sheet.


Next, I turned the sheet to the back and using a MS leaf stamp, I stamped several leaves and selected the ones I wanted to use. I cut those out and using my stlyus, dry embossed the leaves and hit the high spots with diffent shades of green Memento Dew Drops inks.

I then used the remaining paper to create a stem. I drew this free hand cut it out and then using the stylus embossed the back. 
 
Again, I used the Memento Dew Drops in green to add more depth.When dry embossing by hand it is a good idea to run a small piece of waxed paper over your piece for an easy moving stylus.


I decided to use the leftover portion as a base of grass. I dry embossed on the back and roughed the edges with the scissors and inked them.  


That is when I ran into a bit of a problem.


While trying to find a backing piece for the flower, I selected to use a striped complementary paper weight sheet.
Well not realizing this was not heavy card stock, I ran the paper through the Cuttlebug twice and ruined it.
I saw a left over piece and tried to salvage. Hence the line through the middle of the base paper--Tim Coffey or Brenda Walton.

I anchored the stem to the paper using glue dots that I rolled into a ball and adhered it to the Bamboo Cuttlebug sheet.

My purpose was to leave space for inserting the leaves.

I strategically placed two foam dots under the leaves and used the Scotch wet glue on the stems.

 
I kept placing the flower on top to get a feel for spacing. Then I was ready to apply the foam dots to the leaves for dimension and glue the stems in place.


Once all the supporting elements were to my liking, I applied liquid glue to the bottom of the flower and held it in place on top of the stem until it adhered.

The last thing to do was to place the grass over the flower and trim the edges. Hello Friends was cut from a Provo Craft folder and the white gel pen to draw a stitch line around the page is from Ranger.


After much further ado, here is what Challenge #3 helped me to create. This was a lot of fun and very freeing in the process.
This is my number three entry, can hardly wait to get to number 4.

Oh, yes. Challenge #4: This one involved a dual challenge. To create a card using one of these four resist techniques: crayon resist, Versamark resist, Versamark with clear embossing powder, and Micro Glaze.

Off to put the final touches to card number four and a reveal on this blog. Anyone want to hazzard guess?


Lovingly in ink,
Until Then

Sunday, September 12, 2010

Buddy Page Swap

Hello everyone. It is finally here; the completed Buddy Page. This was a lot of fun and gave me the opportunity to use up all of those pictures taken by a professional studio. Vee-dios embedded below.


This challenged me in several ways: creating a page for some one else, designing in such a limited format (6x6) and finally being able to use some flowers on a layout. I was so giddy with excitement, that I did not know to handle it.

Buddy Page Swap part 1


I had wanted to keep the journaling hidden by placing it under another decorative piece of paper but was not able to add that element.

Buddy Page Swap Page 2


Hope you enjoy the layout and can find some inspiration from it.

Keep thinking and inking in the name of love.
Until then

Monday, August 3, 2009

The Spinner Card

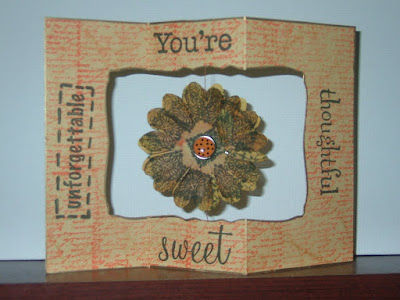
Hello everyone. As promised I am working furiously to post information about my videos on this blog. I had a fab time creating and playing with this card.
The background is stamped with a HOTP (Hot off the Press) phrase stamp. The other sentiments are from Plaid All Night Media. I overstamped the flower and used brads on both sides. I love the simplicity of the card.

For this next one I went a little lighter and added the adorable flower stamp from KI Memories. The garden embellishements are from a pack of buttons I picked up on clearance from Michaels. I simply removed the button shanks and attached them using my favorite adhesive: Glossy Accents from Ranger. The center flower is three layers with the top one being a flower encased in epoxy.


I was not into complicated measuring and cutting so I formulated a suitable and workable substitute that would allow me to assembly line-- mass produce these cards. I do hope that you give it a try. Following is another take on that same idea. I wanted to use up any remaining embellishments. Waste not, want not.


Can I make the claim that these cards will provide endless hours of enjoyment? I could barely put mine down in order to edit the video. You can find it here.


And this is the trio I produced. When they were on my bookshelf a slight breeze caused them to turn and flutter. Ahhhh. Pure bliss.
Keep creating and inking in the name of love.

Until then.

Saturday, August 1, 2009

Back on track

Wow. This has been a whirlwind time for me. I realize that I have been extremely tardy in posting to this blog. All for a good reason. I have been busy making videos for Youtube. I have also added a link so that you can view them from here. I am currently working on videos 8, 9, and 10. There is sooo much to do that I get chills just thinking about all of the creative ways to use my products.

Just this week, I received an order from Luminarte. It is loaded with Twinkling H20s, Radiant Rain and Daubers. The colors are simply luscious. Look to see card and page layouts using those products appearing soon. At some point I hope to post all of the cards I made on Youtube and have some of the instructions available for anyone who would like to duplicate the ideas.

Just in case you thought my life ended at Easter, it did not. Here is a card that I sent to my mom using the emboss resist technique with a Fancy Pants flourish stamp, a nestability die, some water color paper, and distress inks. I almost did not want to add the Happy Mother's Day message to the front because I did not want to detract from the overall symmetry of the card. At the last minute I stamped a small greeting and hand cut and layered the circles. The flower is held to the aperture using the Glossy Accents from Ranger. That stuff is awesome. I use it like glue most of the time.

This is the inside view. The left side is stamped with a variety of flower images and I used Sakura pens to add a bit of sparkle.
I also used the Fancy Pants stamp to create a border on the right hand side. I like how the flower and the scalloped circle mimic each other. This is one elegant card. My mom says she received numerous compliments.
Remember to think in ink and always in the name of love.
Until then.

Sunday, March 8, 2009

The Brown Series Three

Hello again. This is card number three in the series. One more to go and then we can move on to some other creative ideas. I wanted to show how you can take the same basic design and put a twist on it. This is a great way to maximize that left over paper. Or you can start with a 12x12 sheet and cut it down. Done properly you can get at least 16-20 cards completed without skimping on the materials. Hmmm. That gives me ideas for my next few posts.


Still using the invitation remnants I again stamped the Fiskars quote onto the orange cardstock and inked the edges. This time I carried the background swirl stamp onto the quote. It was then adhered to the brown paper--all Bazzill. On this photo you can see where I used a fantastic swirl stamp from Little Yellow Bicycle. I applied three different shades of ink to the stamp and did primary and secondary generation stamping to achieve this effect. I absoloutely adore this stamp set. You will see more of these images on cards and scrapbook pages I create.


To add more creativity I ran the three tabs through a Cuttlebug folder. Then I used the tourquoise/blue ink and swiped it over the raised portions. This really made the images POP.


I was excited to use some new Petaloo flowers I received. I layered an orange and soft blue felt flower over the polka dot to tone it down a bit and adhered the entire ensemble together with a brown brad. The polkas mimic the dots found on the three squares cardstock at the bottom of the card.

I had so much fun testing my creativity with this series. I really like the randomness and the free form of this card. This also gives me designs for my arsenal. They are simple enough to be mass produced in a short amount of time. They can easily be turned into anniversary, sympathy, get well or whatever card with a simple switch of the quotes.


The final card in the series is cute if not totally unique. Look to find it here in a few days. Maybe over the weekend if I get ambitious.

Of course it is inked with lots of love. Why bother to ink, if it is not Inked in the Name of Love.

Until then.

Friday, March 6, 2009

The Brown Series Two

Hello. This has been a whirlwind weekend for me. It has been read across America week to celebrate the birthday of Dr. Seuss. I read aloud The Gingerbread Cowboy to my son's kindergarten class and then again to a group of sixth graders on Friday. They both loved the western take on an old classic. I love reading. I will devour a good novel in one evening. It has been discovered that I will read to exhaustion.

Upon coming home I hurried to my computer because Kelly at Flowers to Flourishes was having a marathon sale this weekend. You had to register by March 2nd to participate. I was good. I think I only ordered two items on Friday and three on Saturday. The sale ran through Sunday night where I picked up several bargains. I might just faint when I see my invoice. I am so glad that she hooked up with our QVCYahooScrappers group to get this event going. Thanks, Kelly, you ROCK.

Back to the title of my post. This is the second card in my brown/earth tone series. I have been working to step out of my comfort zone. I took a few close ups to give a better idea of some of the techniques I used.

On these two flowers I stamped that fabulous medallion on the orange and a second generation stamp on the lt. blue flower. I adhered the felt centers using a cream colored brad.

On the right hand side of the card I stamped a medallion below the flower to echo the one I decided to use on the flower.
Kind of like a repeat pattern. I also used the medallion to stamp a background on the card since I decided not to use a backer. There is a lot going on with this card, but I wanted the look to remain simple in appearance; therefore, the background effect is achieved through second generation stamping.

If you look closely at the
bottom tags you will notice that the corners have been rounded. Each was embossed using three different circular cuttlebug folders.
After embossing I used a cosmetic wedge to transfer the blue ink to the raised portion of each embossed center.
I then used the Anna Griffin Chocolate Ink to stamp the sentiments from Inkadinkado peg words set. They are intentionally stamped at an angle.
The main quote is from Fiskars and is stamped in chocolate on orange which is inked in blue and matted on brown cardstock--all from Bazzill. Of course to finish off the card I edged the entire perimeter in blue ink. There is ink all over this card. I really love the title quote: Life is a journey, not a destination. Enjoy yours and spread a little Ink in the Name of Love along the way.
Until then.

Monday, March 2, 2009

The Brown Series One

Hello again.

Wow, do I have a treat for you. While cleaning in my studio, I came across some papers I had used for designing some wedding invitation samples. Then I remembered the Little Yellow Bicycle stamps that I had recently received and the creative juices began flowing.

I recalled that I had cut the sample paper to specific measurements. Then I thought how can I test my new stamps and use up all of my paper to create a variety of cards by simply changing the greeting/journaling?

This is the first result of my efforts. I had so much fun working on this card. I did hit a lull when I could not decide how to or if I should use the medallions. Yes, you read correctly. I stamped with Tim Holtz Marmalade Distress Ink and cut out three of them. I finally settled on the one in the left hand corner. You will probably see the other two show up on another card.

The Thank You is from Imaginisce, stamped with Anna Griffin Chocolate ink and trimmed using the Deckle edge scissors. All other paper used on the card is from Bazzill texture. I love the Bling paper, especially the String of Pearls which is what I used for the medallion and the Thank You. The handwriting stamp is from Paper Wishes Hot off the Press. I absolutely adore their rubber stamps. The detail is incredible.

And now for the focal part of the card. That breathtaking butterfly and the stem of flowers. I could not decide how to approach the butterfly. I finally decided to use a variety of the Tim Holtz Distress inks with my stipple brush. Once I had coverage in about three different shades, I pounced using the Chocolate ink. The outline of the insect was meant to be left open, but I closed it off by using a Marvy Uchida brown fine tip marker.

For the flowers I used a variety of Marvy markers. Lt green and dark green was used on the leaves. That same brown was used for the stem and the flower were a mixture of orange and scarlet. I tried to go deeper on the edges of the flowers to give them some depth. I was pleased with the overall presence of the card. The small dots leading to the butterfly are also from a LYB stamp set. The ribbon is American Crafts, brad from PaperWishes and flowers are Prima. Of couse I could not leave well enough alone. Once I had finished stamping the handwriting pattern, I used that same brown ink to pounce the edges of the card. A bit of orange was mixed in for the top and bottom of the card.
My aim is to see how much I can maximize this color combination. Of course each one will be happily Inked in the Name of Love.
Until then.

Monday, February 9, 2009

Something Old is New Again

While doing more organizing, I came across a card that I stamped about seven years ago. I was creating sets for myself and had a blast doing so. This is one of my early attempts at cardmaking. I thought I would post a pic here.


The stamp is from PSX K-2291 (Stamp Exchange). I only wanted to use one of the images and repeat it, so I masked off the others. That is the one thing I LOVE about stamps, the versatility.

I used Marvy Uchida markers to color the flowers and black ink and clear embossing powder for the quote--Stampendous L062


Sorry that it is a little blurry. I was trying to take this photo at night. If I get a chance I will shoot another and repost. I used a variety of inks to sponge the background. It is something inspiring that I can send in the mail for encouragement to someone in need.


If you are a stamper, think of how you can take stamps that you already own and mask off parts of it to create something new. Something old will definitely be new again. If you are a beginning stamper, select stamps that will offer versatility and you will get more for your dollar. As always, Ink in the Name of Love and you can never go wrong.

Until then.