Showing posts with label Nestabilities. Show all posts
Showing posts with label Nestabilities. Show all posts
Tuesday, January 12, 2010
Clip Art Christmas Cards
Phenomenal. I have got to admit that this last minute brainstorm really worked in my favor. Since I was spending more time on the computer and editing Vee-dios, I was running out of time to make my own Christmas cards. Well, I had to resort to the easy way out, and loved what resulted.
(Photo to be inserted)
Using the free clipart samples from Dover Publications, I was able to whip them out lickety-split. I called upon my square and oval Nestabilities and Cuttlebug folders to give my cards some uummph and that personal touch. You might want to check out Dover and take advantage of some of their great sales on their CDs.
Using the snowman to create a pyramage was great. It could also be used as an invertage (the image builds from the center upwards).
(Photo to be inserted)The frame around the reindeer draws your eye to him. Using that tartan plaid Cuttlebug folder makes this a male friendly card. You could easily change the backing papers to a floral or swirl design and totally change the appearance of your card.
(Photo to be inserted)I am determined that my Christams 2010 cards will be totally handmade by me using my original artwork.
Well, I am feeling determined NOW...we shall see.
Regardless of where the artwork originates, there is one thing you can count on, they will definitely be inked with love.
Until then.

Sunday, November 29, 2009
Extended Spellbinder Dies
Happy Thanksgiving and I hope you enjoyed spending time with your family and friends or some quiet alone reflection time for yourself. We have much for which to be THANKFUL.
For this latest creation all I can say is WOW! When I began with this card I had no idea it would transform into what it did.


The picture to the left shows just how much I extended the square. The one just above shows the longer rectangle created from the square die.
That sequed into the idea to create 12 inch border strips for my scrapbook pages. Now, I am realizing an unlimited possibility for these dies. Maybe I will do an entire video devoted to that concept.

Here is the bare card placed on the extended large scalloped square die. In the video the card is turned the other direction and the black pearlized card covers the edges. I could have extended it width wise by using the same process.
 Some people use the inexpensive hair spray, but I use the Blair matte fixative. It is low odor--there is a no odor version.
 The Tim Holtz Distress Inks are incredible. I orginally stamped the tree using the distress inks and embossed with a tinsel powder also from Ranger. The look was really nice. Much softer than the one in the video. I am posting the picture I was playing around with for effect. You can definitely see the difference.
After returning to it a few times, I think I will try the Distress Inks again but maybe in blue for a wonderful winter scene with lots of snow on the ground and smaller trees in the background or peeking into the foreground around the edges. Truly a winter wonderland.


While I was having fun, I also created an oval version of the tree.
I am not sure about anyone else but I had the dickens of a time trying to keep the oval die from moving while embossing. Yes, I tried taping it down. I knew I should have purchased that magnetic spacer mat when I had the chance. Oh, well, next time.


Lab Equipment used:
Nestabilities:
Classic squares large (used the largest)
Classic scalloped square large (used the largest)
Classic oval large (used the largest)
Classic scalloped oval large (used the largest)
Cuttlebug:
Flourish and Snowflake folder
Distress Inks:
Black Soot and Dusty Concord
Stamp:
Rubber Stampede Pine Tree
Watermark Cat's Eye
Ranger:
Cut and Dry Foam stamp pad
Jacquard:
Pearl Ex Inteference Violet
Fine Glitter:
Pastel Party Mix/ Lavender
Silver tinsel embossing powder that I mixed myself.
Ribbon from Michaels
DCWV:
White card stock
Green card stock
Flower Soft:
GluePolar White
I am busy playing around with my HSN Cuttlebug holiday folders. That was to be my next series of videos, but this one happened to fall into place. All of the prep work has been done for the videos, I just simply need to film them. If my lovely son will allow it, I will start this week and see how far I can progress.
Thanks for stopping by and please keep inking in the name of love.
Until then.
Monday, August 3, 2009
The Spinner Card
Hello everyone. As promised I am working furiously to post information about my videos on this blog. I had a fab time creating and playing with this card.
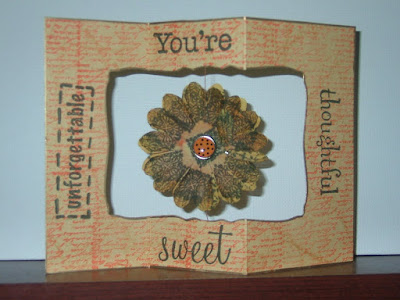 The background is stamped with a HOTP (Hot off the Press) phrase stamp. The other sentiments are from Plaid All Night Media. I overstamped the flower and used brads on both sides. I love the simplicity of the card.
 For this next one I went a little lighter and added the adorable flower stamp from KI Memories. The garden embellishements are from a pack of buttons I picked up on clearance from Michaels. I simply removed the button shanks and attached them using my favorite adhesive: Glossy Accents from Ranger. The center flower is three layers with the top one being a flower encased in epoxy.

I was not into complicated measuring and cutting so I formulated a suitable and workable substitute that would allow me to assembly line-- mass produce these cards. I do hope that you give it a try. Following is another take on that same idea. I wanted to use up any remaining embellishments. Waste not, want not.

Can I make the claim that these cards will provide endless hours of enjoyment? I could barely put mine down in order to edit the video. You can find it here.
And this is the trio I produced. When they were on my bookshelf a slight breeze caused them to turn and flutter.
 Ahhhh. Pure bliss.
Keep creating and inking in the name of love.
Until then.
Sunday, August 2, 2009
Frog Leg Card/Diamond Fold Card

Hello crafters and welcome back to Inkallusions. I am finally getting it together by learning how to portion my time better. I become so involved in what I am doing that I lose all track of time.

I would like to share some 4th of July cards I made to decorate my home this year.

I have taken creative license and renamed the Diamond Fold card to the Frog Leg Card courtesy of my son. At first glance he exclaimed, 'It looks like a frog's legs'. I could not agree more. Thus the christening of this card. Since we were nearing the celebration of the birth of the United States of America, I chose to create something patriotic. These are the results.

I have taken creative license and renamed the Diamond Fold card to the Frog Leg Card courtesy of my son. At first glance he exclaimed, 'It looks like a frog's legs'. I could not agree more. Thus the christening of this card. Since we were nearing the celebration of the birth of the United States of America, I chose to create something patriotic. These are the results.

I can see this design being used as place cards for the holidays or a rehearsal dinner displaying a photo of the bride/groom to be with the appropriate attendant/parent. What a wonderful keepsake which can be displayed year round. This is what the card looks like when it is flat in the envelope.

Here is a view when it is opened and displayed.
 You can watch this video to see how it all came together.
 You can watch this video to see how it all came together.
 Of course you can create the look of additional layers with the creative use of ink. As always keep inking in the name of love.
Until then.
Friday, May 8, 2009
Still Easter
Yes, it is still Easter at my house. We actually have not put away the decorations. I am enjoying having them out since we have been innudated with rain for the past few weeks. I have to admit the dreariness was getting me down. When I looked up and spied one of these cards looking back at me my spirits were immediately lifted. I hope they have the same impact on you.
This one is fun and whimsical. On looking back on it, I should have stamped grass under the feet of the bunnies. They look like they are just floating. When I create more for mailing, I think I will do just that. A card can never have too much ink.

These photos show a close up of the girl and boy bunny. Aren't they precious? The entire set is from Studio G. Gotta love those dollar stamp sets. I used the Sakura gel glaze pens on these. I got carried away with apertures and glaze. That raised embossed effect you get is incredible.


This one is fun and whimsical. On looking back on it, I should have stamped grass under the feet of the bunnies. They look like they are just floating. When I create more for mailing, I think I will do just that. A card can never have too much ink.
These photos show a close up of the girl and boy bunny. Aren't they precious? The entire set is from Studio G. Gotta love those dollar stamp sets. I used the Sakura gel glaze pens on these. I got carried away with apertures and glaze. That raised embossed effect you get is incredible.


This final picture is of the flowers in the center of the card that makes that aperture come alive. .jpg) I used the Nestabilities scallop circles and since they are graduated, used one die for the paper and a smaller die for the card behind the aperture. The paper by the way is from Die Cuts With a View. I had a chance to pick up a kit that has some inspirational paper and embellishments to get you crafting.
I used the Nestabilities scallop circles and since they are graduated, used one die for the paper and a smaller die for the card behind the aperture. The paper by the way is from Die Cuts With a View. I had a chance to pick up a kit that has some inspirational paper and embellishments to get you crafting.
I stamped the image using Black Staz On ink and used my Glitter markers and glaze gel pens on the flowers and the sentiment.
.jpg) I used the Nestabilities scallop circles and since they are graduated, used one die for the paper and a smaller die for the card behind the aperture. The paper by the way is from Die Cuts With a View. I had a chance to pick up a kit that has some inspirational paper and embellishments to get you crafting.
I used the Nestabilities scallop circles and since they are graduated, used one die for the paper and a smaller die for the card behind the aperture. The paper by the way is from Die Cuts With a View. I had a chance to pick up a kit that has some inspirational paper and embellishments to get you crafting.
I stamped the image using Black Staz On ink and used my Glitter markers and glaze gel pens on the flowers and the sentiment.
It was hard to reign myself in and not add more ink to the card. Mmmm. This one is inkalicious. And as always done with love.
Until then.
Thursday, May 7, 2009
More Easter
Although Easter Sunday has come and gone, it is never to late to share ideas for the coming season if the Lord is willing and the creek don't rise. ( I heard that growing up.) Here are a couple of more cards for your enjoyment.

This is the card opened. I decided to use the aperture to place a phrase inside the card. The photo below shows what the card looks like when it is closed.
 The base of the card started out white and I used several shades of yellow and green to achieve this look. I tried to keep it analogous and use black as a powerful accent. The He Is Risen is slanted on purpose. I wanted to give the illusion that the circle is rising towards the heavens. Again, I inked using the stencil brushes. I just love those.
 So as not to be outdone I gave the words some sparkle and shimmer of their own using the Sakura glaze pens and some of the Fiskars glitter gel pens. And of course the eggs wanted in on the bling action. I feel that the gel pens really brought this card to life. The 3-D effect is outstanding.

It was a lot of fun experimenting with these cards. I had never done apertures before and once I started I could not stop. So guess what you will see on the next five cards or so? You are sooo smart. Apertures. As always I will find creative ways to Ink in the Name of Love.
Until then.
Wednesday, May 6, 2009
Spring Has Sprung
Hello everyone and a belated Happy Easter!!!!


The photo to the right is a close up of the cover behind the marching bunny. I used glitter markers here as well as inking the background in a soft pink using a stencil brush. Instead of pouncing, I swirled.
I have been so busy creating that I have not taken the time to update my blog. I am popping in tonight to share a few Easter and Spring cards that I created. Please enjoy. The bunny in the  center is actually a ceramic pen that I repurposed for this project. The words and eggs came from the Studio G $1 stamp sets.
 center is actually a ceramic pen that I repurposed for this project. The words and eggs came from the Studio G $1 stamp sets.
Although you cannot see the detail here, all of the words were traced using Sakura glaze pens. They give a nice 3-D look and sheen. I also photographed the inside of the card to show some of the detail work there.

I

These photos show the inside of the cards. This is the close up of some glitter markers that I used from American Crafts.


The photo to the right is a close up of the cover behind the marching bunny. I used glitter markers here as well as inking the background in a soft pink using a stencil brush. Instead of pouncing, I swirled.
I truly apologize for being so tardy, but life gets busy every now and again. I had a fabulous time using the different markers, pens, and of course inks. There is no other way to do it. You simply cannot help but to Ink in the Name of Love.
Until then.
Subscribe to:
Posts (Atom)