Monday, August 3, 2009

The Spinner Card

Hello everyone. As promised I am working furiously to post information about my videos on this blog. I had a fab time creating and playing with this card.
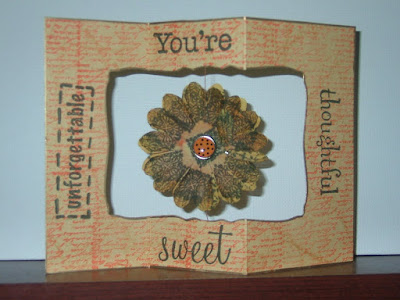
The background is stamped with a HOTP (Hot off the Press) phrase stamp. The other sentiments are from Plaid All Night Media. I overstamped the flower and used brads on both sides. I love the simplicity of the card.

For this next one I went a little lighter and added the adorable flower stamp from KI Memories. The garden embellishements are from a pack of buttons I picked up on clearance from Michaels. I simply removed the button shanks and attached them using my favorite adhesive: Glossy Accents from Ranger. The center flower is three layers with the top one being a flower encased in epoxy.


I was not into complicated measuring and cutting so I formulated a suitable and workable substitute that would allow me to assembly line-- mass produce these cards. I do hope that you give it a try. Following is another take on that same idea. I wanted to use up any remaining embellishments. Waste not, want not.


Can I make the claim that these cards will provide endless hours of enjoyment? I could barely put mine down in order to edit the video. You can find it here.


And this is the trio I produced. When they were on my bookshelf a slight breeze caused them to turn and flutter. Ahhhh. Pure bliss.
Keep creating and inking in the name of love.

Until then.

Sunday, August 2, 2009

Frog Leg Card/Diamond Fold Card


Hello crafters and welcome back to Inkallusions. I am finally getting it together by learning how to portion my time better. I become so involved in what I am doing that I lose all track of time.
I would like to share some 4th of July cards I made to decorate my home this year.


I have taken creative license and renamed the Diamond Fold card to the Frog Leg Card courtesy of my son. At first glance he exclaimed, 'It looks like a frog's legs'. I could not agree more. Thus the christening of this card. Since we were nearing the celebration of the birth of the United States of America, I chose to create something patriotic. These are the results.


I can see this design being used as place cards for the holidays or a rehearsal dinner displaying a photo of the bride/groom to be with the appropriate attendant/parent. What a wonderful keepsake which can be displayed year round. This is what the card looks like when it is flat in the envelope.

Here is a view when it is opened and displayed.

You can watch this video to see how it all came together.

Of course you can create the look of additional layers with the creative use of ink. As always keep inking in the name of love.

Until then.

Saturday, August 1, 2009

Back on track

Wow. This has been a whirlwind time for me. I realize that I have been extremely tardy in posting to this blog. All for a good reason. I have been busy making videos for Youtube. I have also added a link so that you can view them from here. I am currently working on videos 8, 9, and 10. There is sooo much to do that I get chills just thinking about all of the creative ways to use my products.

Just this week, I received an order from Luminarte. It is loaded with Twinkling H20s, Radiant Rain and Daubers. The colors are simply luscious. Look to see card and page layouts using those products appearing soon. At some point I hope to post all of the cards I made on Youtube and have some of the instructions available for anyone who would like to duplicate the ideas.

Just in case you thought my life ended at Easter, it did not. Here is a card that I sent to my mom using the emboss resist technique with a Fancy Pants flourish stamp, a nestability die, some water color paper, and distress inks. I almost did not want to add the Happy Mother's Day message to the front because I did not want to detract from the overall symmetry of the card. At the last minute I stamped a small greeting and hand cut and layered the circles. The flower is held to the aperture using the Glossy Accents from Ranger. That stuff is awesome. I use it like glue most of the time.

This is the inside view. The left side is stamped with a variety of flower images and I used Sakura pens to add a bit of sparkle.
I also used the Fancy Pants stamp to create a border on the right hand side. I like how the flower and the scalloped circle mimic each other. This is one elegant card. My mom says she received numerous compliments.
Remember to think in ink and always in the name of love.
Until then.

Saturday, May 9, 2009

Yet more Easter

Yes, there is more Easter. Just when you thought it was safe to venture out again. I just adore this card. The sentiment is especially endearing. I used the cards that were included in a DCWV kit I purchased from HSN and simply cut the cards apart. The back side was in a solid complementary color. It was like double the value for me.


I took this opportunity to take advantage of the design by doing some doodling on the flowers and tear drop/paisley shapes. Of course I used my Sakura gel and metallic pens to bling out the patterns. I really need to pick up additional


packets of these pens. They are truly addictive.

I did not have to do much in the way of deciding where to add my accents. They screamed at me all on their own.

Although it does not clearly show on the card above, the bunnies are extremely reflective. I used the Sakura clear glaze pen and colored over the bunnies that I had stamped in StazOn black.
The heart and the swirls around the bunnies were enhanced with American Crafts glitter pens.

I love Easter and Spring. It is a new beginning and a rebirth. There is no better way to celebrate the risen Christ. This is a time when seemingly fragile plants force their way through hard, cold soil and brave the elements to let us know that change is on the way.

Our world becomes filled with brilliant color and a wide array of nature's beauty. This is what gives us more ideas for colors to use in our lives. I take the time to ponder how I can use these combinations to add life to my cards and scrapbook pages. Inking in the name of love. You can't go wrong.
Until then.

Friday, May 8, 2009

Still Easter

Yes, it is still Easter at my house. We actually have not put away the decorations. I am enjoying having them out since we have been innudated with rain for the past few weeks. I have to admit the dreariness was getting me down. When I looked up and spied one of these cards looking back at me my spirits were immediately lifted. I hope they have the same impact on you.

This one is fun and whimsical. On looking back on it, I should have stamped grass under the feet of the bunnies. They look like they are just floating. When I create more for mailing, I think I will do just that. A card can never have too much ink.


These photos show a close up of the girl and boy bunny. Aren't they precious? The entire set is from Studio G. Gotta love those dollar stamp sets. I used the Sakura gel glaze pens on these. I got carried away with apertures and glaze. That raised embossed effect you get is incredible.


This final picture is of the flowers in the center of the card that makes that aperture come alive. I used the Nestabilities scallop circles and since they are graduated, used one die for the paper and a smaller die for the card behind the aperture. The paper by the way is from Die Cuts With a View. I had a chance to pick up a kit that has some inspirational paper and embellishments to get you crafting.
I stamped the image using Black Staz On ink and used my Glitter markers and glaze gel pens on the flowers and the sentiment.
It was hard to reign myself in and not add more ink to the card. Mmmm. This one is inkalicious. And as always done with love.
Until then.

Thursday, May 7, 2009

More Easter

Although Easter Sunday has come and gone, it is never to late to share ideas for the coming season if the Lord is willing and the creek don't rise. ( I heard that growing up.) Here are a couple of more cards for your enjoyment.


This is the card opened. I decided to use the aperture to place a phrase inside the card. The photo below shows what the card looks like when it is closed.

The base of the card started out white and I used several shades of yellow and green to achieve this look. I tried to keep it analogous and use black as a powerful accent. The He Is Risen is slanted on purpose. I wanted to give the illusion that the circle is rising towards the heavens. Again, I inked using the stencil brushes. I just love those.

This next card used those same Studio G stamps and the Sakura glaze pens. I actually used the Sakura pens on the Happy Easter and Ranger clear glaze on the egg to make it shine. Yummy.
So as not to be outdone I gave the words some sparkle and shimmer of their own using the Sakura glaze pens and some of the Fiskars glitter gel pens. And of course the eggs wanted in on the bling action. I feel that the gel pens really brought this card to life. The 3-D effect is outstanding.


It was a lot of fun experimenting with these cards. I had never done apertures before and once I started I could not stop. So guess what you will see on the next five cards or so? You are sooo smart. Apertures. As always I will find creative ways to Ink in the Name of Love.


Until then.

Wednesday, May 6, 2009

Spring Has Sprung

Hello everyone and a belated Happy Easter!!!!

I have been so busy creating that I have not taken the time to update my blog. I am popping in tonight to share a few Easter and Spring cards that I created. Please enjoy. The bunny in the center is actually a ceramic pen that I repurposed for this project. The words and eggs came from the Studio G $1 stamp sets.


Although you cannot see the detail here, all of the words were traced using Sakura glaze pens. They give a nice 3-D look and sheen. I also photographed the inside of the card to show some of the detail work there.


I


These photos show the inside of the cards. This is the close up of some glitter markers that I used from American Crafts.


The photo to the right is a close up of the cover behind the marching bunny. I used glitter markers here as well as inking the background in a soft pink using a stencil brush. Instead of pouncing, I swirled.

I truly apologize for being so tardy, but life gets busy every now and again. I had a fabulous time using the different markers, pens, and of course inks. There is no other way to do it. You simply cannot help but to Ink in the Name of Love.
Until then.